About HaploQA
Current Version: 1.0
The HaploQA web application was developed at the Jackson Laboratory to facilitate genetic quality assurance of mice using genotype data derived from the Neogen genotyping platforms MUGA, MegaMUGA, GigaMUGA and MiniMUGA.
Repository & License
The HaploQA source code can be obtained from the public repository.
        Copyright (c) 2018 The Jackson Laboratory

        Permission is hereby granted, free of charge, to any person obtaining a copy
        of this software and associated documentation files (the "Software"), to deal
        in the Software without restriction, including without limitation the rights
        to use, copy, modify, merge, publish, distribute, sublicense, and/or sell
        copies of the Software, and to permit persons to whom the Software is
        furnished to do so, subject to the following conditions:

        The above copyright notice and this permission notice shall be included in all
        copies or substantial portions of the Software.

        THE SOFTWARE IS PROVIDED "AS IS", WITHOUT WARRANTY OF ANY KIND, EXPRESS OR
        IMPLIED, INCLUDING BUT NOT LIMITED TO THE WARRANTIES OF MERCHANTABILITY,
        FITNESS FOR A PARTICULAR PURPOSE AND NONINFRINGEMENT. IN NO EVENT SHALL THE
        AUTHORS OR COPYRIGHT HOLDERS BE LIABLE FOR ANY CLAIM, DAMAGES OR OTHER
        LIABILITY, WHETHER IN AN ACTION OF CONTRACT, TORT OR OTHERWISE, ARISING FROM,
        OUT OF OR IN CONNECTION WITH THE SOFTWARE OR THE USE OR OTHER DEALINGS IN THE
        SOFTWARE.
Help
Table of Contents
Creating an Account
If you don't yet have an account, following the 'Sign Up' link in the menu will bring you to a form
where you'll need to enter your email and affiliation and set a password. Upon submitting the form, you
should receive an email containing a validation link. Following this link will validate your email
address and log you into your account automatically. You will not be able to log into your account
until you validate your email address.
If the account creation form is successfully submitted (if successful, you'll get a popup modal and on
closing the modal, will be redirected to the home page)but you never receive a validation link, please
send us an email at haploqa@jax.org.
Determining Your User Status
The easiest way of finding out what type of user you are is to select the user menu (far right on the
header). If the menu label reads 'Login' and you have no login information, you are not a user and you may only
view public samples in the app.
If the menu label lists your email address, then you are a user. When the user menu is opened, at the
top of the menu directly below your email will have your status which will be one of three statuses:
Administrator, Curator, or User. This status will affect the options available to you in this menu as
well as select functionalities across the site.
Haplotype Candidate Samples (Curator/Admin Only)
Selecting the 'Haplotype Candidate Samples' option from the user menu will bring you to a page where all of the current haplotype candidate samples are listed and their respective colors. Selecting any of these samples will redirect you to their sample page. Note that their plots will not render as the sample is being used as candidates for non-candidate sample.
Strain Name Admin (Curator/Admin Only)
The 'Strain Name Admin' option in the user menu will redirect you to a page with a list of strain names and
input fields with hexadecimal color values. Clicking within the input field beside a strain name will show a
color picker tool. If you know the hex value of the color you'd like to assign, you can type it directly
into the input field. Otherwise, you can choose a color using the three color select areas in the tool.
Select the 'Confirm Edit' button to save change or 'Cancel Edit' to discard the change. Existing strain
names cannot be changed, but if you wish to add a new strain name, above the list is an 'Add Item' button
which will present a tool to Enter a strain name and assign it a color using the same color tool as before.
Select the 'Add Item' if you wish to save. You will be given a confirmation that your new strain name has
been added successfully, and the page will refresh to order the strain names by color, so you may see if any
strains have been given colors that are too alike.
Note: There is currently no way to remove or edit a strain name through the user interface, so if
there is a need to make those changes, please notify an admin.
Sample Data Export (Admin Only)
Following the 'Sample Data Export' option will bring you to to a page with some options for exporting a set of samples. You can choose which platform you want to export samples from, filter by tag and the option to select a specific range of the genome to export. Once ready, select 'Download Genotype Matrix.' The matrix is a combined SNP report with SNP IDs, chromosome, position base pair, and the alleles at that SNP for each sample.
User Admin (Admin Only)
Select the 'User Admin' option in the user menu to see a list of all current users for the site. Each user
will have an email address that serves as their username and a user level. Clicking on a user's email
address will bring up a page that lists all samples owned by them. To change a user's permission level,
select the desired status from the user level select. Warning! If you change your own user
permission level from administrator, you will be immediately logged out of the system and will not be able
to see the user management page! If this occurs, contact another administrator to have your privileges re-
instated.
Clicking 'Remove' will bring up a confirmation dialogue that requires explains that samples belonging to
this user will not be deleted despite the user being removed. Select 'Confirm' to continue with the removal.
Warning! The System will allow you to remove yourself. If you happen to do this in error,
contact an administrator or a curator for a new invitation. If you use the same email, you will still be the
owner of your previous samples.
My Samples
Open the user menu to select the 'My Samples' Page where you can see your samples organized by tag (and the associated count). Clicking on a tag name will bring you to the list of samples which belong to that tag. The bulk edit feature is available on these lists.
Change/Reset Password
If you are not logged in and have forgotten your password, you may select the 'I forgot my password'
option under the login. This will redirect you to a page where you can enter your email and have an
email with a link to reset your password sent to you.
If you are currently logged in, there is an option in the user menu to change your password. This option
will redirect you to a page where your email is already filled in and you enter your old password as well
as the new one that meets all the necessary security requirements.
Import Sample
If you have samples to import, select the 'Import Sample Data' option in the header, which will then take you to a page where you can choose the platform you used to generate the data. If the selected platform is MUGA, MegaMUGA, or GigaMUGA select the files you wish to upload for the sample map and final report. If the selected platform is MiniMUGA, you'll only have a single file select but you can select multiple files. For the MiniMUGA platform, you should have been provided with one file per sample. When you're finished, select the 'Import Samples' button. You will see a progress bar while the import is processing. Depending on the size of your sample data, it may take a few minutes for the process to complete. When the import is complete, the progress bar will read 'Data Import Complete' and a green banner will appear with a link to a list view of all of the samples that were uploaded. Some fields may not be completed and they can be filled by bulk editing (see 'Bulk Editing Samples').
Sample Pages
Breakdown of Sample Data Fields
The first section on every individual sample page is a table of general data regarding the sample. Question mark icons indicate a quick-access explanation when you hover over the icon. The following provides a brief explanation of these (also refer to Figure A):
- Sample ID: The initial sample ID is a unique ID randomly generated by HaploQA. The sample ID from the sample map file is provided in parentheses.
- Owner: The single user that can make changes to the sample.
- Last Update: 'N/A' initially upon import, or the timestamp of the last time the sample was updated and who updated it.
- Last Haplotype Calculation: the timestamp of the last time the haplotype calculations were run on the sample or, by default, 'N/A'. See 'Running Haplotype Calculations' below for more information.
- Strain Name(s): Where possible, the official strain name should be used for strains that are archived by a public repository (The Jackson Laboratory, MMRRC, EMMA, etc.). The official strain name can be found on the strain data sheet / page. An example is C57BL/6J-ApcMin/J (https://www.jax.org/strain/002020). A comprehensive archive of strain information from repositories world-wide is the International Mouse Strain Resource (www.findmice.org). If the strain doesn’t exist in a public repository, any owner-designated strain name can be used. Genomic intervals from data sets with the same strain name can be compared below using the “comparison sample” pull-down option.
- Strain ID: The strain ID refers to the unique identifier assigned to a strain by a public repository. Examples include 002020 (JAX stock number), or EM:07481 (EMMA ID), or 036938-UCD (MMRRC). If the strain doesn’t exist in a public repository, this field can be left blank or a substitute Strain ID can be used. The Strain ID can be bulk edited in the previous page for any samples that share a tag.
- Sex: The sex of the animal from which the sample was collected can be provided here.
- Platform: The current version of HaploQA uses MUGA, MegaMUGA, GigaMUGA or MiniMUGA genotyping array platforms ( http://genomics.neogen.com/en/mouse-universal-genotyping-array).
- % Het. Calls: The percentage of probes for which heterozygous genotypes were called.
- % Hom. Calls: The percentage of probes for which homozygous genotypes were called.
- % No Calls: The percentage of probes for which genotypes calls could not be made due to probe failure.
- % Concordance: The percentage of genotype calls that are concordant with the expected, user- selected contributing strain backgrounds.
- Tags: Tags are relational key words or phrases that can be assigned to individual samples to facilitate queries.
- Haplotype Candidate: If this sample is a ‘control’ sample representing a potential contributing strain background, then choosing “true” will allow it to be used as a contributing strain for haplotype construction.
- Engineered Target Positive Controls: The GigaMUGA genotyping platform includes probes representing the most commonly found genetically engineered alleles (e.g. cre, EGFP, etc.). HaploQA can use intensity values from these probes to infer the likelihood that a genetically engineered allele is present provided that sufficient control data exist. If the sample is known to harbor a particular genetically engineered allele (for which a probe exists), then it can serve as an engineered allele positive control. This field should include the name of the genetically engineered allele, therefore an understanding of the existing engineered probe selection is needed. For more information see Morgan et al., 2015.
- Engineered Target Negative Controls: The GigaMUGA genotyping platform includes probes representing the most commonly found genetically engineered alleles (e.g. cre, EGFP, etc.). HaploQA can use intensity values from these probes to infer the likelihood that a genetically engineered allele is present provided that sufficient control data exist. If the sample is known to NOT harbor a particular genetically engineered allele (for which a probe exists), then it can serve as an engineered allele negative control. This field should include the name of the genetically engineered allele, therefore an understanding of the existing engineered probe selection is needed. For more information see Morgan et al., 2015.
- Visibility: Users can control whether the sample can be viewed by non-users (or those who are using the app without signing in).
- Notes: A free form text field for added any notes to keep on the sample.
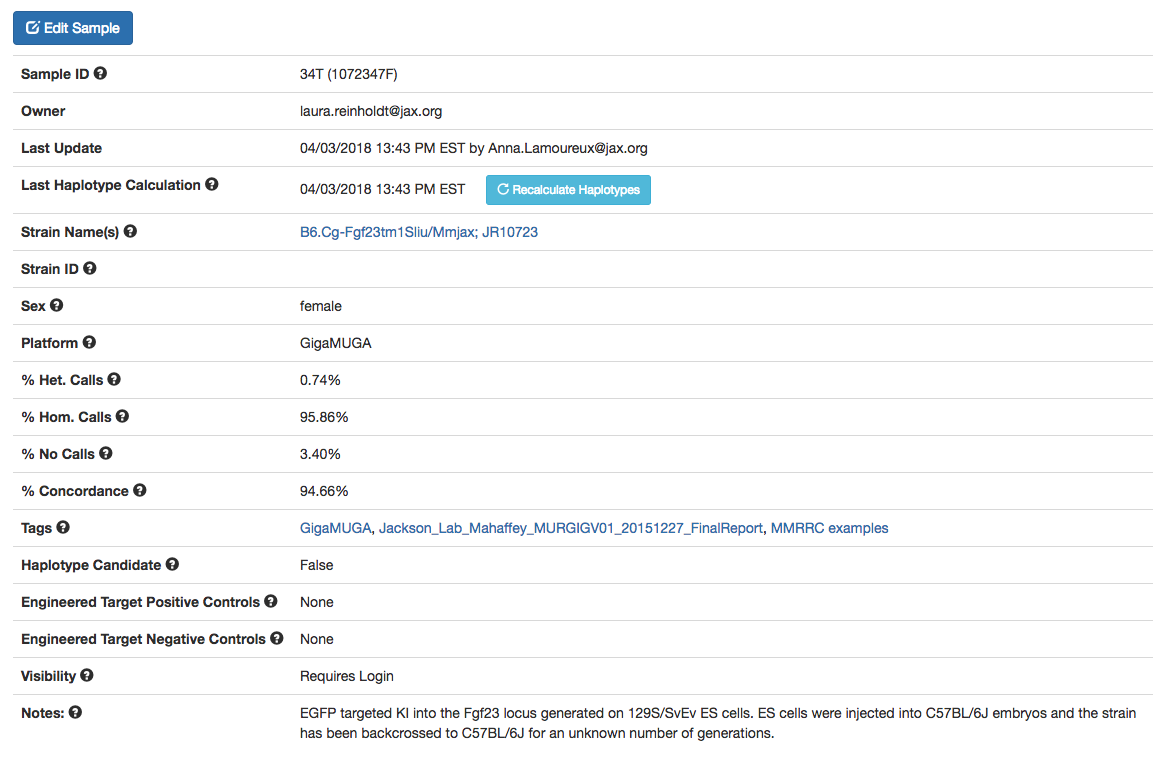
Figure A: Example of the data table of a sample
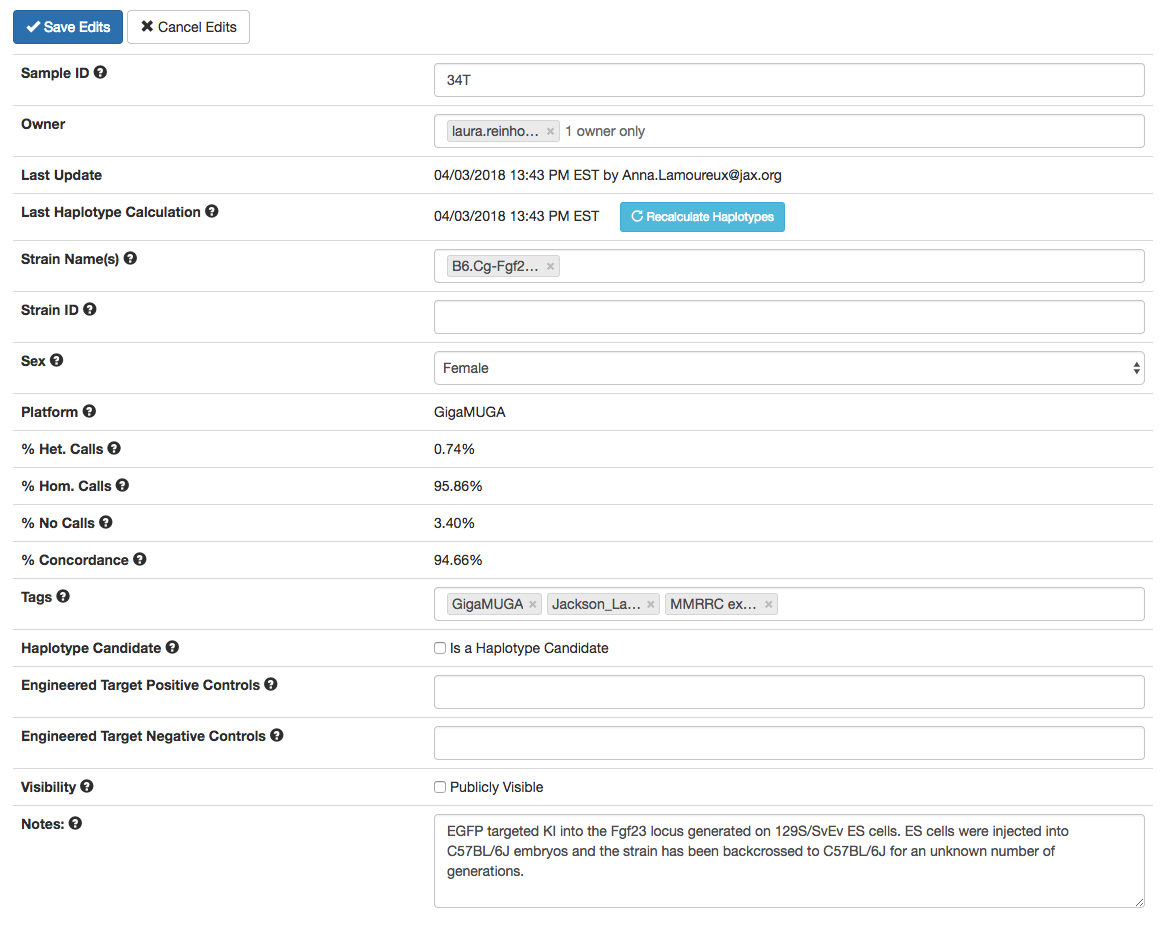
Figure B: Editable fields of the same sample as an administrator or owner with curator status sees. Other users will not have the 'Haplotype Candidate' checkbox.
Edit a Sample
While on a sample page, selecting 'Edit Sample' (only available if you own the sample or are an admin) changes the table of data into a list of editable fields:
- Sample ID: Users can edit the unique sample ID that HaploQA creates to a custom unique ID, but the ID in the parentheses that is generated from the map file cannot be changed (i.e. for a sample ID of '43YD (NIH_TVD_GU-H1)', the ID '43YD' can be changed to a different unique value, but not 'NIH_TVD_GU-H1').
- Owner: Current owners can assign the sample to a different user. Caution! If you are not an administrator, and you assign your samples to another user (and save the edits), you will not be able to edit further them unless an administrator or the sample's owner changes its ownership to you.
- Strain Name(s): Where possible, the official strain name should be used for strains that are archived by a public repository but if the strain doesn’t exist in a public repository, any owner- designated strain name can be used. Genomic intervals from samples with the same strain name can be compared below using the “comparison sample” pull-down option.
- Strain ID: If the strain doesn’t exist in a public repository, this field can be left blank or a substitute strain ID can be used. This field is one that can be bulk edited.
- Sex: Sex can be changed to male, female, or unknown.
- Tags: Add or delete enter-separated tags in this field. Tags can be search terms and each tag appears on the HaploQA homepage.
- Haplotype Candidate: This is a option only available to an owner with curator status or administrators. If this sample is a ‘control’ sample representing a potential contributing strain background, then choosing “true” will allow it to be used as a contributing strain for haplotype construction. In order to be considered for haplotype candidacy, the sample cannot have an 'unknown' sex and can only be assigned strictly ONE strain name which cannot have been assigned to any other haplotype candidates in the same platform
- Engineered Target Positive Controls: Add or delete names of genetically engineered alleles that act as engineered target positive controls, therefore an understanding of the existing engineered probe selection is needed. If you're not sure about these, the field can be left blank.
- Engineered Target Negative Controls: Add or delete names of genetically engineered alleles that act as engineered target negative controls, therefore an understanding of the existing engineered probe selection is needed. If you're not sure about these, the field can be left blank.
- Visibility: Change whether users not logged in can see the sample
- Notes: Change this text field as you see fit. Nothing in this field will affect the sample.
- Contributing Haplotype Strains: A little further down the page, directly above the genome karyotype plot, is a field where you can add or remove contributing strains. Any saved changes in this field will re-render the karyotype plot as the haplotype probabilities are recalculated based on the updated list of contributing strains.
Running Haplotype Calculations
On the import of a sample, the haplotype probabilities that are represented in the plots are calculated.
Initially, the value for 'Last Haplotype Calculation' will be N/A until it is done again. If later, a user
wishes to add or remove a contributing strain, the haplotype probabilities will be recalculated based on the
updated list of contributing strain. If you desire to re-run these calculations without altering the
contributing strains, you can use the 'Recalculate Haplotypes' button located in the data table toward the
top of the sample page. The timestamp beside this button lists the last time the calculations were run on
the current sample and the last update timestamp will update to match that of the calculation row with
information about the user as well.
In general, all calculation runs are considered updates but not all updates will trigger the calculations.
For example, if a note is made on the sample, the last update timestamp will change but the calculation
timestamp will remain the same.
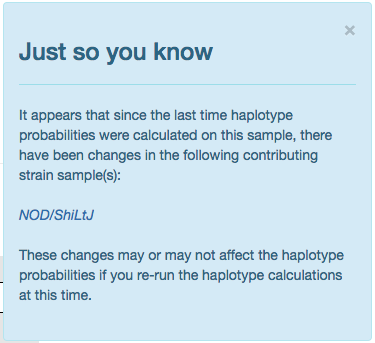
Figure C: Sample candidate strain update notification
Notifications on Candidate Strain Updates
Occasionally the haplotype candidate representing a contributing strain will change. If one has been updated
for a given sample since the last time haplotype probability calculations have been run, then a blue alert
will appear in the lower right corner of the window, see Figure C. This notification will list any/all
contributing strains that have changed and each will be a link that will redirect you to the strain’s list
of samples. This alert is intended to let you know that if you run the calculations again, the calculated
probabilities may change and the plots rendered on the current reference sample may change.
NOTE: In this release, the notification will alert you to any updates to the candidate strains,
even if the change only consists of a small change, such as a new tag. However, we hope to be able to
determine if the changes are major or trivial in the future. Until we improve this feature, if you get this
notification and wish to re-run the haplotype calculations on your sample but are worried the changes to the
candidate strain will affect the rendered plots, email
haploqa@jax.org.
Using the Genome Karyotype Plot
The plot rendered in the Genome Karyotype Plot section of any sample page depicts the haplotype composition of the sample genome, by chromosome, based on a Hidden Markov Model (HMM), see Figure D. The vertical axis indicates the chromosome and the horizontal axis, chromosome location in Mb. Intervals that contain two different colored bars represents intervals where there are two possible contributing strains with high probabilities of being haplotypes over this interval rather than just one. Red vertical bars above the haplotype bars indicate discordance over that interval.

Figure D: Diagram depicting a single chromosome in the karyotype plot for a sample with areas labeled
Hovering over a colored haplotype section will highlight other sections of the genome that are associated
with the same contributing strain including areas of the interval plot(s) further down the page.
Additionally, hovering over a contributing strain (located directly above the karyotype plot) will respond
the same way. Clicking on any of these strains will redirect you to a list of all the samples with that
given strain name. Clicking on any area of the genome bars will load roughly 10Mb of that chromosome,
centered on the location clicked, in the genome interval plots below.
There are options to download the karyotype plot as a PNG directly below the plot as well as a summary of
the haplotype composition and a SNP level haplotype report.
Using the Genome Interval Plot
The genome interval plot (see Figure E) is meant to allow you a more in depth and interactive view of the genome’s haplotype composition. By default, without any interval being selected from the karyotype plot, the plot(s) will load the first 10Mb of Chr 1. If there are other samples with the same strain name as the current (reference) sample, two elements will be visible: a select menu to the upper right of the section and the comparison interval plot, itself. If there are no other samples with the same strain name or if the current sample does not have a strain name assigned to it, these two elements will not appear on the page.
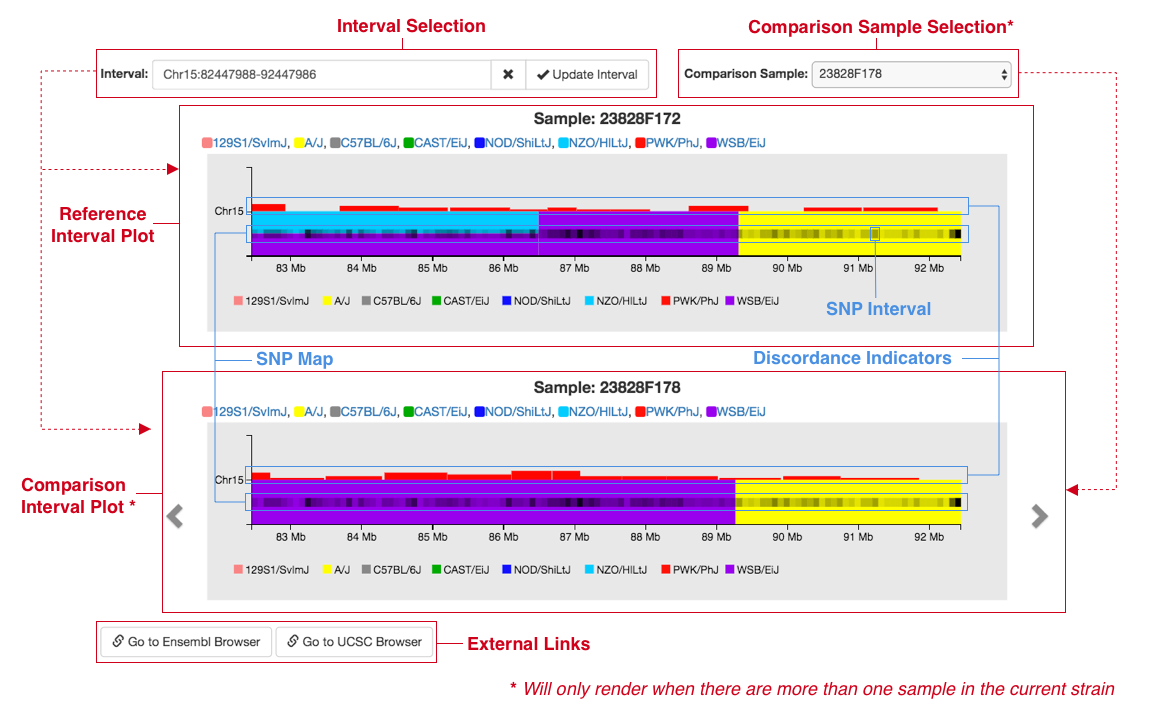
Figure E: Diagram displaying elements of the genome interval plot section of a sample page. Elements identified by dashed lines are elements that are dependent on comparison samples being present
There are two ways to choose which comparison sample you'd like to visualize. The first is to use the select
menu previously mentioned, which contains all other samples with the same strain name. If you know
exactly what sample you'd like, select a sample name to visualize it in the comparison plot.
Each plot will have the sample’s name listed above it to make it clear what sample is being shown.
Another way to navigate through comparison samples, especially if you don't have one in mind and are just
curious, is to use the arrows to the left (render the previous sample) and right (render the next sample) of
the comparison plot. Comparison samples will render in the same order as they are listed in
the select menu in the upper right.
The interval plots are synchronized so interacting (e.g. panning or zooming) will change both of the plots.
Panning can be done by clicking and dragging left and right and zooming by using a scrolling mechanism, like
a mouse wheel or a trackpad that supports scrolling. We currently do not have buttons that achieve these
interactions yet but hope to have this feature in a future release. Hovering over contributing strains
behaves the same as it does in the karyotype plot so hovering over a strain for one interval plot will also
highlight blocks and strains in/for the other interval plot as well as the karyotype plot. However, the
hover effect is not active on the actual haplotype intervals in the interval plot(s) so hovering over the
haplotype blocks within the interval plots won't trigger any highlighting behavior.
A central feature of the interval plots is a heatmap-like visualization of SNPS across the chromosome (SNP
map) on the haplotype bars made up of rectangles (SNP intervals). The value of a SNP interval (how light or
dark it is) represents how many SNPs are present in that interval relative to the maximum number of SNPs in
a given interval. This map is dynamic so as the interval in the plot changes, the maximum number of SNPs in
any given SNP interval will be represented by a black (100% opacity) interval and the opacity of all other
SNP intervals will be calculated based on the maximum. When you zoom in, the SNP intervals will remain the
same width visually but will become more precise as they cover a smaller smaller area on the chromosome.
Once a SNP interval only contains one SNP, hovering over that interval will cause a tooltip to appear which
will list the SNP ID, position, allele data, probe call data, and haplotypes. The haplotype(s) listed in the
tooltip should match the most likely haplotype at that given position, indicated by the color of the
haplotype bar.
The input in the top left is the interval selection. By interacting with the two plots, the values listed
here will automatically update based on what is being displayed in the interval plot(s). If you are
interested in a particular interval, you can enter your own, click the update button and the interval
plot(s) will reflect those changes. If you want to dive deeper into a specific interval, you can use the two
external link buttons below the plot(s) which will bring you to either Ensembl or UCSC to view the same
interval there.
If there is an issue with a sample, the associated plot may show "No data to show" over where the plot
should be. If one of your samples does this and you're not sure why, email
haploqa@jax.org
Candidate Haplotypes Table
The Candidate Haplotypes table is an exploratory interface that allows you to interrogate the genetic makeup
of a sample within the selected interval (the same interval used for the Genome Interval Plot). This table
will calculate a Negative Log Likelihood value for every possible combination of Candidate Haplotypes (note
that this list of combinations uses all available strains and so is not constrained by the currently
specified "Contributing Haplotype Strains" list). The Negative Log Likelihood calculation represents the
probability of observing the sequence of SNP values called for that interval given the assumption that the
haplotype for that interval is the haplotype indicated by the "Candidate Haplotype" column. Intuitively,
this gives you a measure of confidence that the indicated pair of strains (or single strain) indicated in
the Candidate Haplotype column are responsible for the genetic makeup of the current interval. Table rows
are sorted in order of most probable to least probable.
This table can be useful to you in exploring regions where there may be errors or contamination. eg: If you
see an area where there is high discordance between the predicted haplotypes and the sample, you can check
to see if there is the possibility of contamination by looking at these probabilities within the interval of
interest. If you see that strain names are showing up in the table with a much smaller negative log
likelihood than the expected haplotypes this may indicate that there is a problem that should be
investigated further.
Bulk Editing Samples
While viewing a list of samples (most often a group of samples with the same tag), if you see an 'Edit
Samples' button above the list, you can bulk edit the current list. While using this feature, any changes
you make will update all the samples currently being listed and are checked. If you wish to exclude a few
samples from the bulk edit, uncheck the box to the left of the sample ID of the sample you want to exclude.
If you only want to edit an individual sample, you can click on that particular item and edit it from its
sample page, see 'Edit a Sample' section for more details. The Owner, Strain ID, Tags, and Contributing
Strains, and Visibility fields can be bulk edited. See 'Breakdown of Sample Data Fields' or 'Edit a Sample'
section for more information on what data is stored in each of these fields and how the data then affects
the sample.
In bulk editing, the Tags and Contributing Strains fields operate under three different 'modes' that can be
selected from a select menu located to the right-hand side of the field. By default the bulk edit section
will be in 'Add' mode where all tags or contributing strains entered in the field will be added to the
current list of tags or contributing strains for all selected samples. There is also a 'Remove' mode where
all tags or contributing strains entered in the field will be removed from the current list of tags or
contributing strains for all selected samples. Finally, the 'Set' mode will overwrite the all existing lists
of tags or contributing strains for all selected samples with the tags or contributing strains in the field.
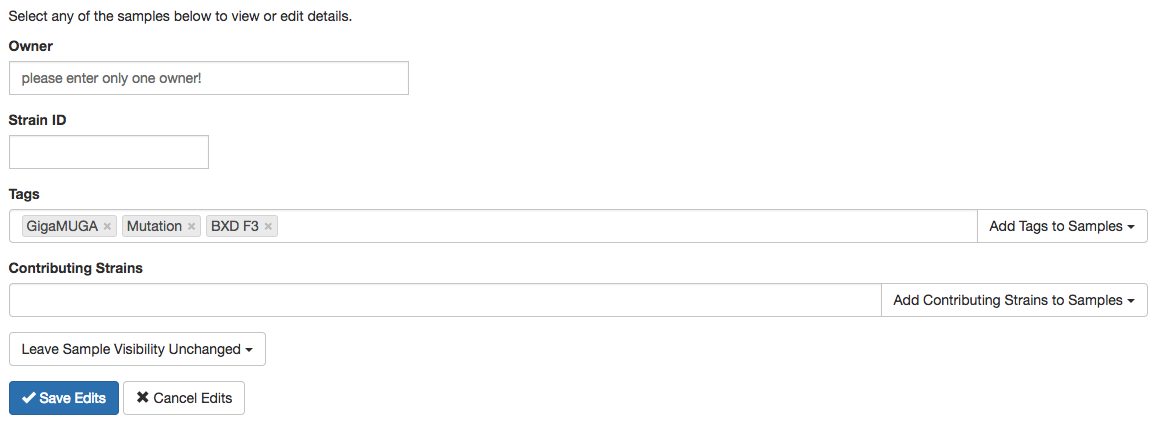
Figure F: Bulk edit tool with the editing modes to the right for tags and contributing strains fields.
Editing visibility in the bulk edit feature allows you to keep all samples unchanged in visibility (the
default) or you can make all selected samples public or private. Making the samples public will allow
everyone, including people not logged in, to see the samples where as making the samples private only
allow logged-in users to see the samples.
When finished editing, select the 'Save Edits' button to initiate the bulk editing. If, at any point, you
decide not to make the changes, select the 'Cancel Edits' and all changes will be discarded. Leaving a field
empty will keep the respective field for selected samples unchanged.
Viewing/Searching All Samples
Clicking on the 'HaploQA' title in the header will bring you to the homepage; a directory of samples by tag.
The first "tag" is for all samples, which will include untagged samples. Clicking on this tag will show you
all samples in the app if you are a logged in user or all public samples if you're not.
If you click on a strain name, you'll be brought to a list of all samples belonging to that strain. Above
the list is a button that allows users to download a combined haplotype composition summary report which will
download a haplotype composition report for all samples in the list, in one file. If a sample is a candidate
for a contributing strain, it will not be included in the combined report as it won't have a haplotype
composition for the report.
You can use the search field in the header to search for samples by tag, primary sample ID, secondary sample
ID, strain name, strain ID, sex, or platform. For example, the term 'bxd' will locate samples with a primary
id, secondary id, strain name or strain id containing the string 'bxd'. Searches are not case-
sensitive.
Creating a New Strain (Curators/Admin only)
When a new strain that hasn't been created for any of the existing genotype platforms needs to be added,
as a curator or admin, go to the 'Strain Name Admin' page located in the user menu and follow
the instructions for adding a new strain.
Once the strain is added, you'll need to locate the sample you wish to assign to that strain as the haplotype
candidate for the platform(s) you need. If the new strain needs to span across all platforms, you'll need to
assign haplotype candidate samples for each platform. If you only need the strain for a particular platform,
you'll only need a haplotype candidate sample for that platform. If you need details on how to do this,
take a look at the the section for editing a sample and specifically the
details on the 'Haplotype Candidate' property for more information on limitations.
When all of the candidate samples are assigned for the needed platforms, the new strain will be available
as a contributing strain to samples on those platforms.